Sunday, July 21, 2013

Lighting . Studio photo session~

After submitting all the portfolio and stuff, we are learning a new topic today which is lighting. Mr Vinod asked us to find some vintage men or women studio photograph during the 40s or 50s which is suitable for ourselves. And we have to imitate most of the aspects in the particular photo, including the hair style,clothing,expression, most importantly is the light source and shadow position,which is the main purpose for the whole exercise.

On the photo shooting day, we were all suit up accordingly to the way the person in the photo looks like. Among all of us, Song's outfit was my favourite.


Look at his outfit,the hair style,his honest look and the combination of the glasses. This is so vintage with a bit of factionalism.

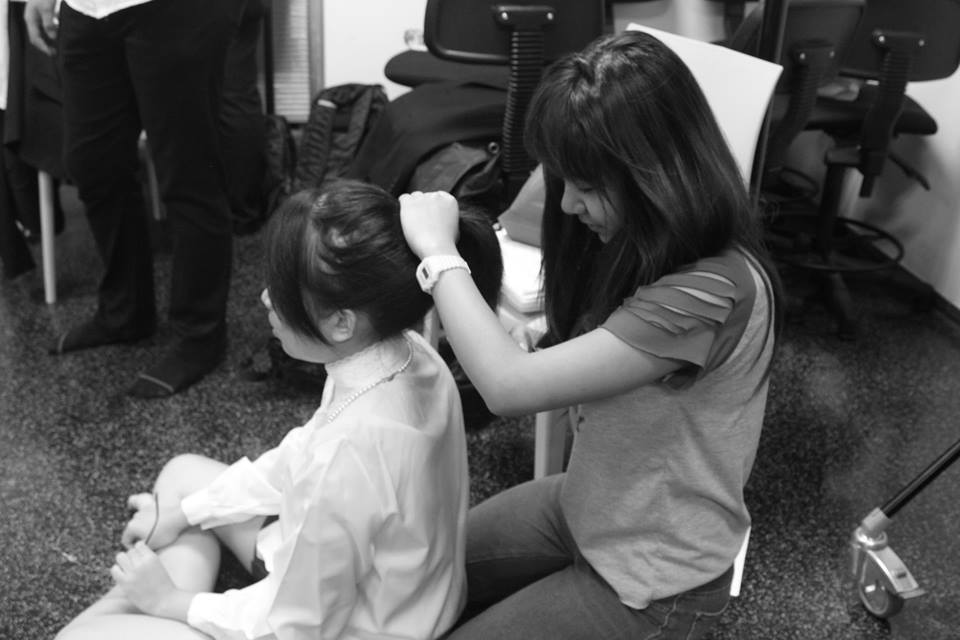
For guys,our hairstyle and suit is quite simple to prepare it,while girls are lot more complicated. The main reason is their hair. Those vintage ladies like to do wavy hair as their trend of fashion,so our girl classmate have to perm their hair just like the model in the photo.


Taking a formal studio photo is way more complicated than what we imagined. Besides,a studio photo session couldn't be possibly done without the teamwork of a group of people. According to Mr Vinod, the group of people in a studio consist of a camera man,camera assistant, hair stylist ,make up artist,fashion designer,at least 2 light man,and a model.All of them must contribute their own strength and work as a team to produce the best outcome.So we were instructed by Mr Vinod to try every position in a studio to feel and learn the importance of the task for each crew.

The camera man will first observe and analyse the light source and those tiny detail of the photo. Then,make up artist,hair stylist are taking part for the physical appearance for the model. Next,a professional fashion designer will overlook and check the entire exterior of the model for the final submission. The light men are mostly doing a tough job as carrying those heavy light equipments around according to the instruction from the camera man. Model is definitely a tough task too! We all experienced that since we are the model for the exercise.We have to freeze ourselves for around 20 to 30 minutes for a single shot.And it is damn tiring and most of us a shivering especially when our hand is posed in the middle of air.

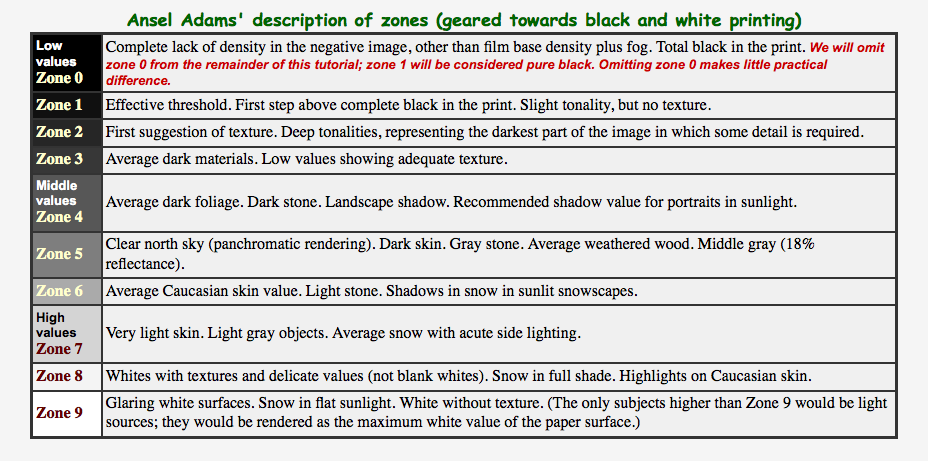
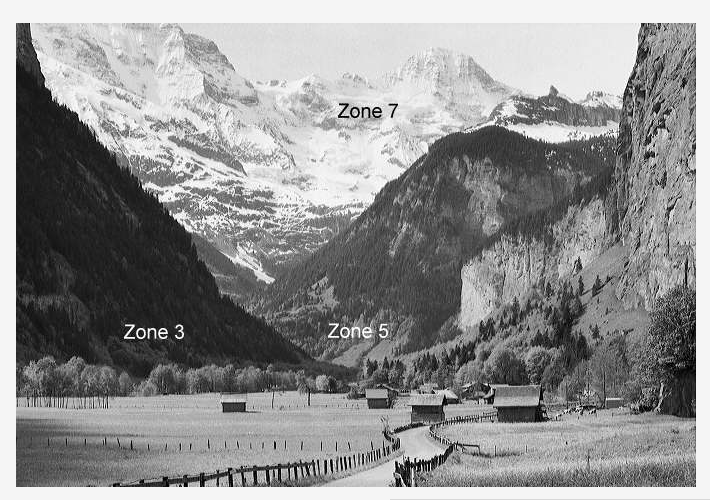
Throughout the exercises, i have learnt the way to analyse the light source and the position of the whole scene.The background light,dim light,fill light,hair light...There's so many kind of light for a single photo and i am sure that we're all taking it for granted everytime we look at a photo. It tooks a lot of effort and sweat for the whole production,although is tough, but the sense of accomplishment is enough to cover up all the suffering we gone through.
These are some photos taken by myself while conducting the photo session : ~


Annie are you okay? Are you okay?


Well, this is my results~


The lighting is not that correct and is kinda dark compared to the original photo.The reason is my crews are totally exhausted and they have helped us to take the shots from the beginning of the exercise,especially i am the second last person for the shots.Hence,the results is kinda different compared to the first photo.Anyways,i appreciate the effort they have made for the whole photo session and well done! *clap

Without Mr Vinod's help, I don't think we can manage to complete the exercises. Since we're still new to the studio,we have a lot to learn.

Wednesday, June 26, 2013

Final Project

Pebbles

These are the  top 5  photos for my theme~


So tiring when i took these photos. Squatting,bending,lying on the hot cement floor.Even got some scratches on my knee and elbow.I think that's the sacrifice for a good outcome.As the saying goes "there is no free lunch" in the world.

Rationale


I love photos, but not taking the shots by myself. When I was young, I saw people carrying a lot of camera equipment’s which seems pretty heavy and walking around the street to take photo. My first impression for a photographer is that shooting photos is a troublesome and tiring activity which I won’t even want to touch it. However, every time I saw some awesome photos taking by some unknown photographer, my curiosity is flooding all over my head and giving me the urge to study the particular photo. I really want to know how those photographers are able to shoot such an excellent shot. Hence, I am currently taking photography course now to understand more about the knowledge and the fascination of photography.Our final project in photography for this term is to choose our own theme and pick the best 5 photos for the portfolio. This project inquiries all the photography knowledge that we gained throughout the semester. Furthermore, we need to exert fully of our creativity and point of view to a certain level in order to produce a high quality outcome.The first thought of my topic is pebbles because the courtyard in my house is full of pebbles and I would like to give it a try. I have no much idea of how to make a rigid pebble looks more vivid and interesting, so I did some research and references in the internet and learnt some useful tips for this particular topic. Angle and composition is very important for my topic. These 2 aspects will definitely change the pebble into a more interesting way. Secondly, the sharpness and focus of the picture is also a crucial condition for pebbles, this is will allow me to see the roughness and crack of the pebble’s surface. The combination of the color of the pebbles is very important too. It allows us to determine the gradation and radian of the whole picture.I have learnt a lot from the final project and it might help me for my further assignments as well. Is was quite challenging and exciting during the photo session. In fact, enjoying the whole process is one of my greatest acquisition after all.


Ansel Adams theory


Ansel Easton Adams~known for the best black and white landscape photographer.
He developed a zone system which need visualization.
The technique is carefully observe and study the particular scene,next, visualize the final print,then determine the corresponding portion of the scene and the tones in the print.


Now, our exercise about the zone system is we need to take 3 sets of pictures which included black,grey and white.The exposure of the first pair of photo is determined by the camera itself while the second pair is by ourselves.

The results should be like this~


For the second exercise, we need to take a scene or landscape which included the 3 zone in it.
After taking the best photo, then we have to sent it to the photo lab to print it out with the size of 5x7.
Moreover, we also need to photoshop the photo into 4 different type, which are RGB, B&W, grey and CMYK.
The purpose of doing this is to determine the slightly difference between these mode of photo editing, and we could choose the best way for our further photo shooting.


The first exercise was quite easy since we only have to choose black,grey and white subjects to shoot,plus differentiate the colour ourselves.
While the second exercise is harder.Because we have to choose a suitable location or scene which includes all 3 zones in the zone system.Well,i took a picture of a small creek in our university just beside the lake. After that,change it into black and white mode.Then, i used Adobe Photoshop to turn the photo into 3 more different mode which are CMYK,grey scale and RGB.
Mr Vinod told us to print the photos in a photo lab which called "Applied Imaging",near 1Utama. Luckily, the place is not too far from where i lived and i can always go to the lab in no time.Therefore,most of my classmate requested me to help them for the printing since I'm the nearest one.And of course they paid me for that.A single piece of 5x7 photo cost me about RM3.50. For me is not too expansive and the quality is not bad at all.So is worth it.


Ceiling fan experiment

Shutter Speed is the duration of time where the shutter remains open to allow light to reach the camera lens.

Using a fast shutter speed will apparently "freeze" the motion of the picture.

An experiment was carried out by capturing the motion of the ceiling fan with different shutter speed.
The results was recorded from fan speed 1 to 5 accordingly.
ISO and aperture is being adjusted at the same time to capture more light for the picture.


Taking 55 photos at the same point are so tiring, seriously. Besides, the light source for the ceiling fan is also important for the outcome because once the shutter speed is decreasing,more light is needed or else the photo will become very dark. My problem is the maximum ISO for my camera is only until "high resolution" , and i don't know if it is 3200 or higher but i m sure that is above 1600. As you can see my last 2 photo is getting darker compared to the others. Luckily Mr Vinod accepted it or else i would have to redo this troublesome experiment. Secondly, inserting 55 photos including title,bio and descriptions are way too compact for a A4 paper. I've spend 4 to 5 hour in editing the position and size of the photo into microsoft word. 
Anyway, i have learnt about the power of freezing images by adjusting shutter speed throughout the experiment. And is quite useful.

Shutter speed & ISO

This particular exercise was about how ISO will affect the photo.
We were told to adjust the ISO increasingly but aperture and shutter speed remain constant.
Below is the result of the experiment : ~


The second exercise was to adjusting the ISO and shutter speed simultaneously.


Both exercises was conducted in my house and the my girlfriend was willing to be my model. Throughout the experiment, i have learnt that the 3 main aspects, aperture,shutter speed and ISO are related to each other in order to obtain a sharp and great shot. If one of the aspect is taking all the responsibility alone, a good photo could not be possibly exist without the other's support.


Aperture Exercise

We were told by Mr Vinod,our photography lecturer to bring a DSLR camera and a tripod on that day.
After we have done setting up the tripod and camera, we were instructed to focus on the subject which is the handrail, and set our aperture to the lowest. Mine is F4.5

For the 1st exercise, shutter speed and Iso are constant throughout the whole experiment.
We can only change the aperture to the next stop.
I took the picture up to F22.

Ex.1


For the second exercise,the subject is the same.
But the shutter speed was adjusted until the indicator stay in the middle, which means aperture and shutter speed is increasing simultaneously.


Is kinda tiring at the beginning because we need to crouch or squat on the ground when taking the photos, and listen to the instruction given by Mr Vinod. But it gets easier when i understand the operation of aperture and shutter speed of the camera. Hence, is not too bad for the first class though. At least i learnt something new.